Let’s discuss a bit of Distributed File System before we see how to set it up in the enterprise. The DFS is used to build a hierarchical view of multiple file servers and shares on the network. Instead of having to remember a specific machine name for each set of files, the user will only have to remember one name; which will be the central access point to a list of shares found on multiple servers on the network. This can be interpreted as the central location of all file shares with links that point to one or more servers that actually host those shares. DFS has the capability of routing a client to the closest available file server by using Active Directory site metrics.
Use-Case Scenario: Suppose that in my enterprise, I have 50 machines. On 5 machines, I have set up various shares and when anyone want to access some documents etc. from a file share, they have to explicitly remember the machine name on which the share exists. Now in case if there are 10 shares existing.. it will make life more difficult. So if there is a single share which can access all these different shares (which are sitting on 10 different machines), how would it be… It would save us a lot of time and everything would be available centrally at one location.. Looks interesting.. Now you got to know why DFS if useful.. There are a couple of DFS definitions to learn like, DFS Root, DFS Link, DFS Target etc.. Let’s see them while we traverse through the setup.
Steps to setup DFS:
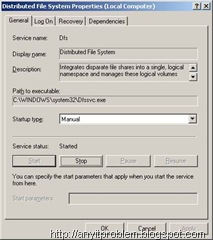
On the Windows 2003 Server where you want to setup DFS, go to Start->Run->Services.msc. This will open up the Windows Services that are installed on the machine. You can see that the DFS Service is not started.
In case if this is stopped, please start the service.
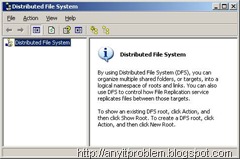
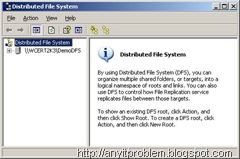
Now go to Start->Administrative Tools->Distributed File System and click on it.
Clicking on this, would start the following Wizard.
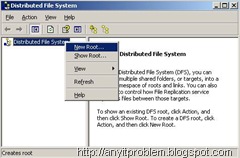
Right click on the Root Node and click on New Root option .
DFS Root: This is the share name that’s visible on the network and you can add additional shares (files and folders) to this root.
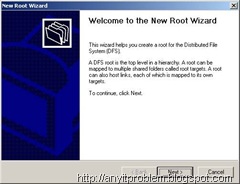
This will start the New Root Wizard.
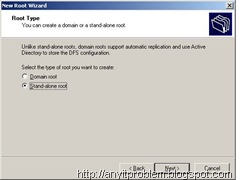
Click on Next and select whichever is applicable. (either Domain Root or Stand-Alone).
In case if Domain Root is selected, then in the next screen it shows up all the domain names available in the network .
In case if Stand-Alone option is selected, it shows up the machine within the domain on which root is to be configured.
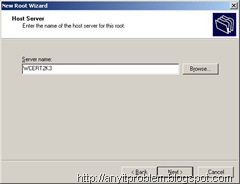
If Domain Root is selected, the domain names are shown. In case if Stand-alone root is selected, domain names screen is skipped and below screen shows up.
Here give the appropriate Server name (Mostly the machine on which the DFS is to be setup).
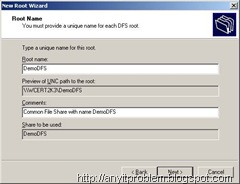
Click on Next and asks for a Root Name. Give the Root name and click on Next button.
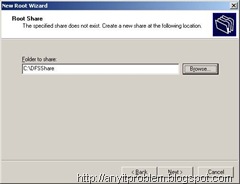
When asked for root folder , give the location of the folder which is sitting on the machine. In my case, I have created a root folder under C:\ with a name DFSShare.
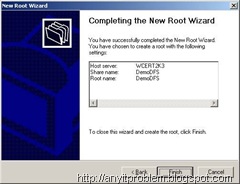
Click on Next and complete the Wizard.
In case if you haven’t started the DFS service initially the following screen shows up. Click on OK and go to services.msc, start the DFS Service. In case if that is already started, the most likely cause would be either the share is being blocked or the network is not proper.
Once rectified, click on Finish button and the following screen shows up.
Once completed, you can see the status of the DFS Link. Go to the root link and click on Status. It shows a little green tick mark and status shows as "Online". Now that the DFS Root has been setup, the next step is to setup a DFS Link. DFS Link is another share somewhere on the network that goes under the root. When a user opens this link they will be redirected automatically to a shared folder.
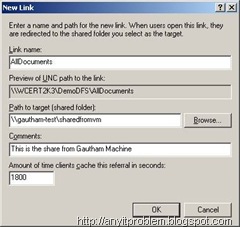
Give a name to the link and most importantly the share location on the network (to which this share actually belongs to). DFS Target talks about the exact share location on the network.
Now as per the setting that I have done here , for the share folder (named sharedfromvm which sits on machine named “Gautham-test”)
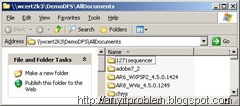
Once the configuration is done, the screen looks as below :
So now the interesting part is, when I click on file://wcert2k3/demodfs/alldocuments, it opens up the share that sits on file://gautham-test/sharedfromvm/
So you can go ahead and add as many links as possible and manage the shares with least overhead.
Thanks for reading through the article. Hope this has helped you out. Have a great day.
Please do post your comments and any queries, please do post us at anyhelpinit@gmail.com




No comments:
Post a Comment