Showing posts with label Windows Tools. Show all posts

NLB- Network Load Balancer

Load balancer is a set up which is used to balance the fluctuations in the load. The following are the steps involved in the setup of the NLB in windows server2003. The concept behind Network Load Balancing is pretty simple: Each server in a Load Balancing Cluster is configured with a 'virtual' IP address. This IP address is configured on all the servers that are participating in the load balancing 'cluster' (a loose term that's unrelated to the Microsoft Cluster Service). Whenever a request is made on this virtual IP a network driver on each of these machines intercepts the request for the IP address and re-routes the request to one of the machines in the Load Balancing Cluster based on rules that you can configure for each of the servers in the cluster. Microsoft this process Network Load Balancing (NLB).We shall see the steps involved in the setup…..

How to setup?
In order to utilize the Windows Server Network Load Balancing features you will need two machines running Windows Server 2003. Each machine needs to have at least one network card and at least one fixed IP address. Although running with one adapter works well, for best performance it’s recommended that you have two adapters in each machine – one mapped to the real IP Address (Microsoft calls this the Dedicated IP) and one mapped to the ‘virtual’ IP Address (Microsoft calls this the Cluster IP). Be aware that NLB uses some advanced networking features of network adapters, so it’s possible that some low end adapters (especially those for non-server machines) may not support the required NDIS protocols.

In addition you will also need one more machine for testing (3 machines total). The test machine should be external as you can’t use a machine from the pool to test – it will only fire request on the local machine since the IP requests are not traveling over the network when you hit the virtual IP address – it goes to the local machine.

I'm going to use two ‘servers’ here to demonstrate how to set up and run NLB. Assume the IP addresses for these machines are 10.50.129.126 and 10.50.129.84. To create a virtual IP address (Cluster IP) you need to pick an available IP Address on the same Class C network segment. In my example here I’ll use 10.50.129.7.

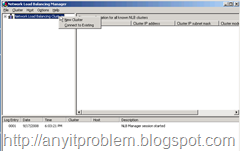
Figure 1 shows what the cluster manager looks like.

image001

Figure 1 – To set up a new NLB cluster bring up the Network Load Balancing Manager and right click to create a new cluster.

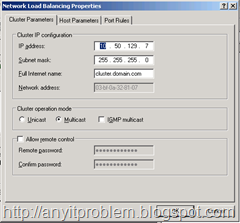
Right-click on the root node to add a new cluster. Next configure the basic cluster configuration, which will consist of assigning the Cluster or virtual IP address. Figure 2 shows what this dialog looks like filled out for our test network.

image002

Figure 2 – Configuring the Cluster IP. This is the ‘virtual’ IP address that will service all servers in the cluster. Note that you should set the operation mode to Multicast if you are using a single adapter.

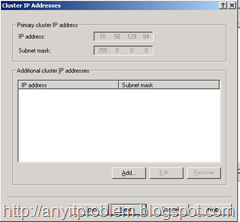
The next dialog called Cluster IP Addresses allows you to add additional virtual IP addresses. This might be useful if you have a Web server that is hosting multiple Web sites each of which is tied to a specific IP address. For our example here, we don’t need any and can just click next as shown in Figure 3.

image003

Figure 3 – If you need to add additional IP addresses to be load balanced you can add them here. This is needed only if you host multiple sites on separate IP addresses and you need separate IPs for these.

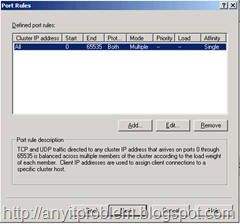
Next we need to configure port rules. Port rules determine which TCP/IP port is handled and how. The default port configuration set up by NLB handles all ports

image004

Figure 4 – The Port Rules dialog shows all of the port rules defined for cluster. By default a rule for all ports – 0 – 65365 is defined

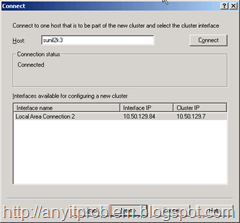
Up to this point we have configured the cluster and the common parameters for each node. Now we need to add individual nodes to the cluster. Figure  shows the dialog that handles this step for the first node as part of the configuration process.

image005

Figure 5 – Adding a node by selecting the IP address and picking a specific network adapter.

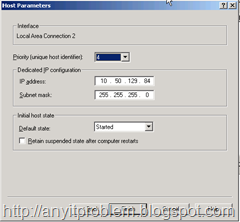
When you click Next you get to another dialog that lets you configure the cluster node. The main feature to configure on this dialog is the Priority which is a unique ID that identifies each node in the cluster. Each node must have a unique ID and the lower the number the higher the priority. Node 1 is the master which means that it typically receives requests and acts as the routing manager although when load is high other machines will take over.

image006

Figure 6 – Setting the node parameters involves setting a priority for the machine, which is a unique ID you select. The lower the number the higher the priority – this machine acts as the master host.

Click finish and now we have one node in our cluster.

When you click finish the NLB manager actually goes out and configures your network adapter for you. It creates a new IP address in your network connections, enables the Network Load Balancing service on your network adapter(s) you chose during setup and configures the setting we assigned on the NLB property sheet.

You’ll see your network connection flash on and off a few times during this configuration process on the machine you are configuring to be a host. This is normal, but be patient until you see your network connection back up and running.

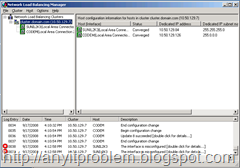
If all goes well you should see your network connection back up and running and see a new node in the NLB Manager sitting below the cluster (see Figure  which shows both nodes). If everything is OK the Status should say Converged. If it does node 1 is ready.

But we’re not quite done yet – we still need to add the second node. To do so right-click on the cluster, after which you go through the steps shown in Figure  one more time.This process is not super fast – it takes about 20 seconds or so to get a response back from a remote machine. Once you click finish the process of Converging can take a minute or more.

image007

Figure 7 – The final cluster with both nodes converged and ready to process requests.

Nothing Related to NLB Article…. It has been a long time that since I have posted in my blog… Was buried under lots of work…..Thanks to Karthik for bringing back the enthusiasm in me to post things again and this gives me lots of happiness..  :-)

Author : Karthikeyan Gunasekaran (g.karthi1986@gmail.com)
About Author : Karthik is working for an MNC and has worked on latest Windows Operating System such as Vista and Windows Server 2008. Please post your comments/suggestions on the writeup. Any information, please write to anyhelpinit@gmail.com
Creating a Root Certificate – For Testing Purpose Only

The various steps involved in creating certificate to enable secure data transmission are as follows. Windows Server 2003 is the base OS here used to create the certificate.

Firstly the pre-requisites necessary are IIS and Certificate Services. Both of these can be installed through “Windows Component Wizard” of Add or Remove Programs. Here is how we install Certificate Services as most of you are aware of installing IIS.

1) Installing Certificate Services

a) Open Add or Remove Programs and click Add/Remove Windows Components from the left Pane. Windows Components Wizard is opened. In the wizard check the box next to Certificate Services.

clip_image002

When Certificate Services check box is checked, a warning window is popped up saying that once certificate services are installed the computer name and domain cannot be changed. Click OK on the popup window and press next.

clip_image004

b) The next windows displays different type of CA’s available. Select “Stand-alone root CA” which is the most trusted CA in the CA Hierarchy. Click next.

clip_image006

c) Give a common name for the CA. Its better to give any unused name in the domain rather than replacing the already created CA name. Click next.

clip_image008

d) Give or Accept default settings for certificate Database settings which include database log location. Click next and a warning window is popped up saying that IIS is temporarily stopped. Click OK on the popup window.

clip_image010

e) Installation of Certificate Services is started and it prompts for I386 folder location. Specify the I386 folder location and press OK. In the process of installation a warning popup window is displayed stating that Active server pages(ASP’s) need to enabled which is a security risk. Click Yes and Proceed.

clip_image012

f) The installation of Certificate Services is Completed. Click on the Finish Button in the Last Window.

2) The next step in creation of certificate is to Create Request File using IIS Manager.

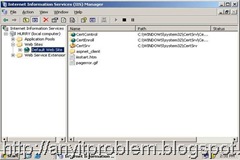
a) Open IIS Manager from Administrator tools. Now, Expand the tree and Select “Default Web Site” as shown.

clip_image014

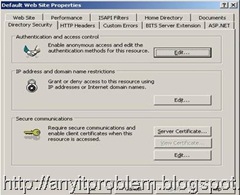
b) Right Click on “Default Web Site” and Select properties. New window is opened with “Default Web Site Properties” title. Select “Directory Security” tab as shown.

clip_image016

c) In the new wizard, select “Server Certificate” under Secure Communications. New certificate wizard is opened as shown.

clip_image018

d) Select next in the welcome page that leads to the window consisting of different methods as shown.

clip_image020

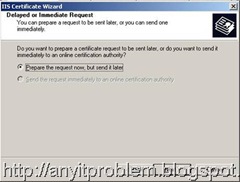
e) Select “Create a new certificate” from the options provided for a new certificate and Select next. In the next window, select “Prepare the request now, but send it later” option and select next as shown.

clip_image022

f) The new page talks about the certificate name and the bit-length of the certificate. Any name can be given and generally default bit length is accepted.

clip_image024

g) Give any name and select next. The next page needs information about organization name etc. Enter the required info and select next.

clip_image026

h) The next page requires the info about Common Name. The name provided here should be the Computer Name that uses the certificate. By default machine name is provided. Click next after you give the machine name.

clip_image028

i) The next window requires info about Geographical information. Fill in necessary fields and press next.

clip_image030

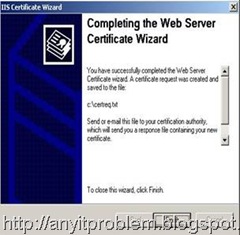
j) The process we followed till now is to create the Request file. The coming window requires the info as to where to place the request file. Select any drive in the machine. Remember the location of the file as it is used to create the certificate.

clip_image032

k) The next two windows of the wizard are the Summary pages and you just need to click next and finish on the next two windows.

clip_image034

clip_image036

As the Request File is ready, the next step is to request “Certificate Authority” for a Certificate. This process is as follows.

3) Launch Certificate Authority from the administrative tools. This function will not be available if Certificate Services are not installed as described in the Step 1.

a) In the Certificate Authority, select the root node, right click on it and select All Tasks.Submit new request as shown.

clip_image038

b) The request file created in the previous step needs to be provided here. Browse and provide the requested *.txt file created as shown.

clip_image040

c) Expand the root node and select “Pending Requests” from the left Pane. In the right pane, the list of all requests will be available.

clip_image042

d) Right Click on the Request and select “All Tasks->Issue” as shown.

clip_image044

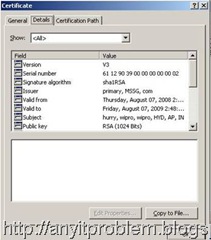
e) In the left pane, select “Issued Certificates”. This lists all the requests that are issued in the right Pane. Right click on the issued request and select Open. The following certificate is opened.

clip_image046

f) Select “Copy to File” option in the opened certificate window. A “Certificate Export Wizard” is opened that is used to export the certificate to the required location.

clip_image048

g) Click next on the welcome screen and the next window describes about the format of the certificate that we want to use. Select the default option and select next.

clip_image050

h) The next window requires the location and name to export the certificate. The certificate created will be placed in that location. Click next.

clip_image052

i) The next Window is the summary window and click “Finish” to complete the wizard. The certificate will be successfully imported to the specified location.

4) The next step is to add the certificate to the system. This process relates to installing the certificate in the system and to provide the SSL port that is needed for secure data transmission.

a) Open IIS Manager from administrative tools and expand the root node to select “Default

Web Site”. Right click on “Default web Site” and Select properties as described earlir.

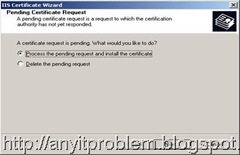
b) Now, select “Server Certificate” option under “Directory Security” tab and click next on the welcome screen as described earlier. The next window talks about processing the request and installing the certificate as shown.

clip_image054

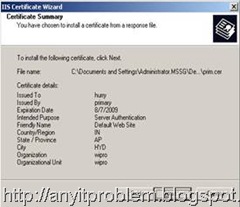
c) Select the default option “Process the pending request and install the certificate” and click next. The next window prompts for the location of the created certificate(*.cer) file that was created in the previous step. Browse and select the certificate as shown.

clip_image056

d) After selecting the certificate click next. The next window displays the port used for secure communication. Generally default value is accepted and is 443. Click next.

clip_image058

e) The next two screens are summary and finish windows. Just click next and finish to complete the wizard.

clip_image060

clip_image062

f) The certificate is installed in the system and is ready to use. The certificate can be customized for any particular application.

Author : Tarun Puttagunta (tarun5125@gmail.com)
About Author : Tarun is working for an MNC and has worked on latest Windows Operating System such as Vista and Windows Server 2008. Has in depth knowledge on the OS concepts/Test Automation. Has a total industry experience of about 24 months.
Please post your comments/suggestions on the writeup. Any information, please write to anyhelpinit@gmail.com
Deleting Unused Devices/Drivers/Services

I was facing this problem for a long time on my lab machines but as I was a bit lazy , ignored this every time. But now when I was setting up Clustering on my Windows Server 2008 machines, this same error cropped up and I was forced to find a resolution for this.
Problem that I had : There were many network adapters that were listed out when I try to see the IP's of my machine. I knew that I am not going to use these extra network adapters and they were causing a big problem. The Drivers or Devices that just won't go away even though you're sure you've uninstalled them then follow this below procedure to get rid of that unwanted driver, device, or service: 
1. Go to Start and choose Run...
2. Now type in cmd and press enter.
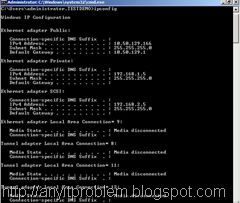
3. At the cmd prompt, type in IPCONFIG.. press enter...  to get a list of all the IP's configured on your machine.

image

4. At the cmd prompt, type in
set devmgr_show_nonpresent_devices=1 and press enter.
5. On the next cmd prompt line, type in devmgmt.msc and press enter. This will launch the Windows Device Manager Console.

 image

6. In the Device Manager Console, from the "View" menu, select "Show Hidden Devices".

image

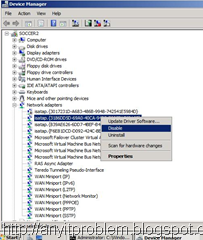
Now, expand the different drivers and devices in device manager and you will see not only the items that Windows currently detects as installed on your PC but there are many other Devices listed. Now you can easily see what all devices are blocking you from performing your task and uninstall/disable them.

image

I would rather prefer to disable them as uninstalling them may effect some other devices (Because I am not sure what are the exact devices to be uninstalled which are causing the error/probem.)

 image

Click on Yes and now you can see that the unnecessary Network Adapters are removed.

 image

Thanks for going through the post. Hopefully this will help you sometime or the other. Please post your comments and for any clarifications please do mail to anyhelpinit@gmail.com
Hyper-V : Creating a New Virtual Machine

For installing Hyper-V console, please go through my other posting at http://anyitproblem.blogspot.com/2008/07/installing-hyper-v-on-windows-server.html

1. Go to Start -> Programs -> Administrative Tools ->Hyper-V Manager to open the Hyper-V Console.
2. Now Right Click on the Machine Name (the machine on which Hyper-V is setup) and select New -> Virtual Machine. This will launch the New Virtual Machine Wizard.

image

3. The Wizard is pretty self-explanatory, but will explain some important screens below. On Before you Begin Screen, click on Next button.

1

4. On the Specify Name and Location screen, there are two parameters to be filled in. a )The first one is the Virtual Machine name and b ) the second one is the location where this should be saved.
In Name Column, give the Virtual Machine name (This is the .vmc file). Here the location Column is disabled because the location column has been provided as part of General Hyper-V Settings. If the location was not set as part of General Hyper-V Setting then it would have asked for the storage location right away. Now if you want to change the storage location then select the check box "Store the Virtual Machine in a different location”. This would enable the location column. Now type in the location of your choice.. Its as simple as that.

2

5. In the next screen, provide the required RAM for the virtual machine. Click on Next Button.

3

6. In the Configure Network screen, select the network that will be used by the VM. In case if you dont see any settings in the combo box, dont panic. We can create a new Network Connection in the Gereral Hyper-V Console settings.

4

7. In Connect to Virtual Hard Disk screen, you have 3 options specified here. a) If you wish to create a new VHD (from scratch) the choose the first option. b) If you wish to use an existing VHD the go for second option. c) If you wish to add a VHD later then go with the third option. (Using this option, you need to add the VHD file name later in the Virtual machine settings)

5

8.When you have chosen to create a new VHD then the following screen is seen. Here in this screen, we can install the OS either from CD/ISO/Network share depending on the option that you haev chosen.
      6

9. Clicking Next will show you the summary of what you have selected so far.

7

10. Now go to the Hyper-V console and select the Virtual Machine that you have just created. Right click on it and click on Connect.
When this gets connected, this will have a toolbar. On that toolbar click on "Start" button for OS installation to start. You can also select the Option "Start" from the settings shown on the right hand side pane.

image

image

Once the OS installation goes fine, your VM is ready for use.
Note: If you have selected option B in Step 7 then in the Hyper-V console (after the Wizard completes), select the VM , right click and select Connect . Now click on Start Button to directly work with the VM.

Thanks for going through the post. Have a great day and any queries please mail us at anyhelpinit@gmail.com