Load balancer is a set up which is used to balance the fluctuations in the load. The following are the steps involved in the setup of the NLB in windows server2003. The concept behind Network Load Balancing is pretty simple: Each server in a Load Balancing Cluster is configured with a 'virtual' IP address. This IP address is configured on all the servers that are participating in the load balancing 'cluster' (a loose term that's unrelated to the Microsoft Cluster Service). Whenever a request is made on this virtual IP a network driver on each of these machines intercepts the request for the IP address and re-routes the request to one of the machines in the Load Balancing Cluster based on rules that you can configure for each of the servers in the cluster. Microsoft this process Network Load Balancing (NLB).We shall see the steps involved in the setup…..
How to setup?
In order to utilize the Windows Server Network Load Balancing features you will need two machines running Windows Server 2003. Each machine needs to have at least one network card and at least one fixed IP address. Although running with one adapter works well, for best performance it’s recommended that you have two adapters in each machine – one mapped to the real IP Address (Microsoft calls this the Dedicated IP) and one mapped to the ‘virtual’ IP Address (Microsoft calls this the Cluster IP). Be aware that NLB uses some advanced networking features of network adapters, so it’s possible that some low end adapters (especially those for non-server machines) may not support the required NDIS protocols.
In addition you will also need one more machine for testing (3 machines total). The test machine should be external as you can’t use a machine from the pool to test – it will only fire request on the local machine since the IP requests are not traveling over the network when you hit the virtual IP address – it goes to the local machine.
I'm going to use two ‘servers’ here to demonstrate how to set up and run NLB. Assume the IP addresses for these machines are 10.50.129.126 and 10.50.129.84. To create a virtual IP address (Cluster IP) you need to pick an available IP Address on the same Class C network segment. In my example here I’ll use 10.50.129.7.
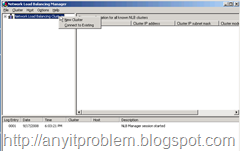
Figure 1 shows what the cluster manager looks like.
Figure 1 – To set up a new NLB cluster bring up the Network Load Balancing Manager and right click to create a new cluster.
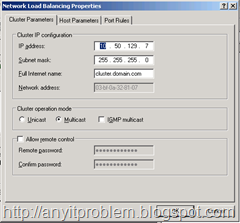
Right-click on the root node to add a new cluster. Next configure the basic cluster configuration, which will consist of assigning the Cluster or virtual IP address. Figure 2 shows what this dialog looks like filled out for our test network.
Figure 2 – Configuring the Cluster IP. This is the ‘virtual’ IP address that will service all servers in the cluster. Note that you should set the operation mode to Multicast if you are using a single adapter.
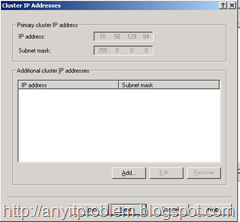
The next dialog called Cluster IP Addresses allows you to add additional virtual IP addresses. This might be useful if you have a Web server that is hosting multiple Web sites each of which is tied to a specific IP address. For our example here, we don’t need any and can just click next as shown in Figure 3.
Figure 3 – If you need to add additional IP addresses to be load balanced you can add them here. This is needed only if you host multiple sites on separate IP addresses and you need separate IPs for these.
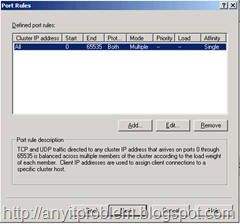
Next we need to configure port rules. Port rules determine which TCP/IP port is handled and how. The default port configuration set up by NLB handles all ports
Figure 4 – The Port Rules dialog shows all of the port rules defined for cluster. By default a rule for all ports – 0 – 65365 is defined
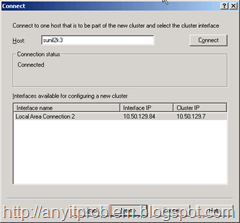
Up to this point we have configured the cluster and the common parameters for each node. Now we need to add individual nodes to the cluster. Figure shows the dialog that handles this step for the first node as part of the configuration process.
Figure 5 – Adding a node by selecting the IP address and picking a specific network adapter.
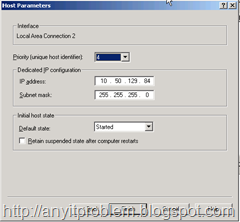
When you click Next you get to another dialog that lets you configure the cluster node. The main feature to configure on this dialog is the Priority which is a unique ID that identifies each node in the cluster. Each node must have a unique ID and the lower the number the higher the priority. Node 1 is the master which means that it typically receives requests and acts as the routing manager although when load is high other machines will take over.
Figure 6 – Setting the node parameters involves setting a priority for the machine, which is a unique ID you select. The lower the number the higher the priority – this machine acts as the master host.
Click finish and now we have one node in our cluster.
When you click finish the NLB manager actually goes out and configures your network adapter for you. It creates a new IP address in your network connections, enables the Network Load Balancing service on your network adapter(s) you chose during setup and configures the setting we assigned on the NLB property sheet.
You’ll see your network connection flash on and off a few times during this configuration process on the machine you are configuring to be a host. This is normal, but be patient until you see your network connection back up and running.
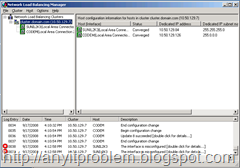
If all goes well you should see your network connection back up and running and see a new node in the NLB Manager sitting below the cluster (see Figure which shows both nodes). If everything is OK the Status should say Converged. If it does node 1 is ready.
But we’re not quite done yet – we still need to add the second node. To do so right-click on the cluster, after which you go through the steps shown in Figure one more time.This process is not super fast – it takes about 20 seconds or so to get a response back from a remote machine. Once you click finish the process of Converging can take a minute or more.
Figure 7 – The final cluster with both nodes converged and ready to process requests.
Nothing Related to NLB Article…. It has been a long time that since I have posted in my blog… Was buried under lots of work…..Thanks to Karthik for bringing back the enthusiasm in me to post things again and this gives me lots of happiness.. :-)
Author : Karthikeyan Gunasekaran (g.karthi1986@gmail.com)
About Author : Karthik is working for an MNC and has worked on latest Windows Operating System such as Vista and Windows Server 2008. Please post your comments/suggestions on the writeup. Any information, please write to anyhelpinit@gmail.com
1 comment:
Hey there. Nice job on this blog! One this to note is that using a single NIC isn't a reason to do Multicast. Typically, we recommend it if the implementation uses Teamed NICs or is running on a virtual server (e.g. Hyper-V or VMware). That's because virtualizing a virtualized MAC address can cause issues. With a single NIC, we just suggest implementing the UnicastInterhostCommSupport registry key per the following KB - http://support.microsoft.com/kb/898867. In Server 2008, this key is enabled by default so Unicast nodes can communicate out of the box. The issue with Multicast is that Cisco routers need the MAC address added to the CAM table for it to work. I recommend Unicast in 90% of implementations.
Keep up the good work!
mirend@microsoft.com
http://blogs.technet.com/networking/archive/2008/10/01/nlb-101-how-nlb-balances-network-traffic.aspx
Post a Comment